
🌟 Introduction
Why did I choose the Global ROM of ZUI?
- Full Google services with first-run setup wizard; no need to log in to a Lenovo account.
- No excessive customization; adheres to stock system standards. No Security Center, no security scanning, and no custom installer.
- Clean and tidy, no unremovable ads, and uses Google Discover as the -1 screen (can be disabled).
- Uses GBoard by default without the customized Sogou Input Method.
- (Cons) The first boot will tempt users to install ad-sponsored apps; pay attention to skip them. Afterward, you can disable the
AppServiceapp to prevent updates/installations.
In my opinion, this is the simple and efficient system a tablet should have. I have tested and flashed it for daily work and entertainment.
Also, flashing the Global version can be done without unlocking the Bootloader, maintaining device integrity without affecting Play Integrity or Widevine L1. If you want higher customization, such as obtaining Root access, flashing custom kernels, or modifying the UI, please read on. This article will cover those details.
💼 Preparation
Download Resources
First, download the necessary drivers and tools.
Drivers and Flashing Tools:
SP Flash Tool for MediaTek devices and the MTK Driver. Visit these distribution sites to get SP Flash Tool and MTK Driver. Alternatively, download from My Cloud Drive Mirror.
Flashing Packages
Lenovo does not publish full ROM packages through public channels, so official download links are scarce. However, you can obtain Global ROM packages used by engineers through the following methods:
- Lolinet Mirror — Frequently updated, contains historical versions.
- My Cloud Drive Mirror — Distributed via OneDrive for fast speeds.
- Other distribution sites like FirewareFile, Needrom, or NinjaROM, though they may have ads or require login.
The latest ZUI 17.0.04.184 is available on my cloud drive for direct download.
Partition Layout File (Scatter File)
The partition layout for Lenovo Xiaoxin Pad Pro 12.7 2025 (TB375FC) must be used with the ROM package. Please choose the corresponding version based on your device capacity (256G/128G). You can get it from My Cloud Drive Mirror. Thanks to the original author @KILO8104 for creating and sharing it.
Android SDK Platform Tools
adb and fastboot commands for fixing boot issues and unlocking the Bootloader.
Please go to Official Google Download.
Install Drivers
Extract the downloaded MTK Driver to a directory that does not contain Chinese characters or special characters, and proceed with the installation. Also, extract SP Flash Tool to a new folder for backing up the stock firmware later.
💾 Full Device Backup
⚠️ Be sure to perform a full device backup before flashing to prepare for any emergencies and avoid losing the serial number.
Enter PreLoader Mode
First, connect the tablet to the computer using a data cable. Click the Power button to shut down or restart. While the device is restarting, long-press the Volume Up button. If everything goes well, you will see a MediaTek PreLoader USB VCOM (Android) device in the serial port section of Device Manager.
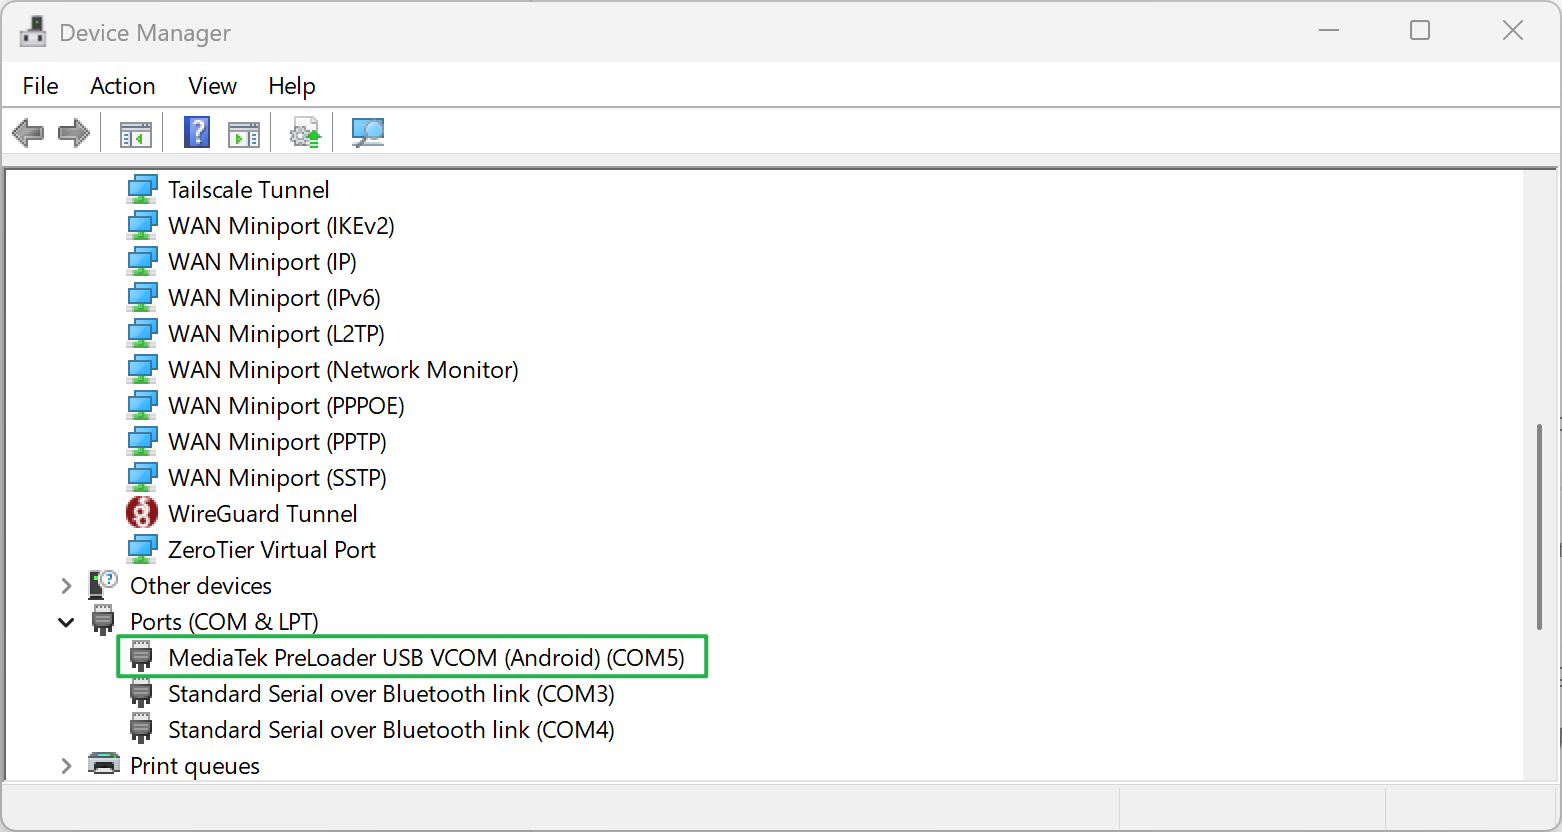
If you don’t connect the cable, the device might enter Fastboot mode since the key combination is the same. In that case, plug in the cable, restart, and try again.
Backup using SP Flash Tool
Extract the ReadBack_Config_(Capacity).zip downloaded earlier into the SP Flash Tool folder.
Run SP Flash Tool, then set the file path at the top to (Capacity)\download_agent\flash.xml.
Switch to the ReadBack tab, change the mode to Auto, and click Read PT. Wait a moment for the software to automatically read the partition table from the device. A successful configuration will look something like this:

Select all partitions except userdata, then click the Read Back button to start the backup. It will take about 6 to 12 minutes to complete.
Once you see the backup completion prompt, it means the backup was successful. You can find the stock files backed up from the device in the Readback directory of SP Flash Tool.
Please keep the backup data safe. These files can be used to unbrick the device and fix a lost serial number.
Restart the Device
While the screen is black, press and hold Power + Volume Up for about 10 seconds. Wait until the virtual COM port disappears from Device Manager, indicating a successful restart.
📤 Flashing the System
⚠️ If you switch versions (China ROM <-> Global ROM) or downgrade, all data on the machine will be erased. Please backup in advance. Version upgrades can be done while keeping data. If the device fails to boot after flashing, please read the repair instructions below.
Enter PreLoader Mode
Refer to the previous chapter and use the same method to enter.
Prepare the Partition Layout (Scatter)
Extract the downloaded ROM package. Rename the downloaded partition layout file for your corresponding capacity to MT6897_Android_scatter.xml and place it in the image\ folder within the ROM package.
Start Flashing
Set Configuration Paths
Run the SPFlashToolV6 provided with the ROM package and set the following file paths:
- Download-XML:
\image\download_agent\flash.xml - Authentication File:
\image\da.auth
Deselect Critical Partitions
After setting the paths, a partition list will appear below. Make sure to uncheck the following partitions:
lk_alk_bdtbo_adtbo_b
Forgetting to uncheck these partitions will result in a permanent hard brick! It is irreversible!
If you are upgrading and want to keep user data, please also uncheck the userdata partition:
userdata
Final Settings and Check
- Set Battery to
auto detectin the top left and checkAuto Reboot. - Must select
Download Onlymode (otherwise it will brick!). - Double-check that all partitions you don’t want to flash are unchecked.
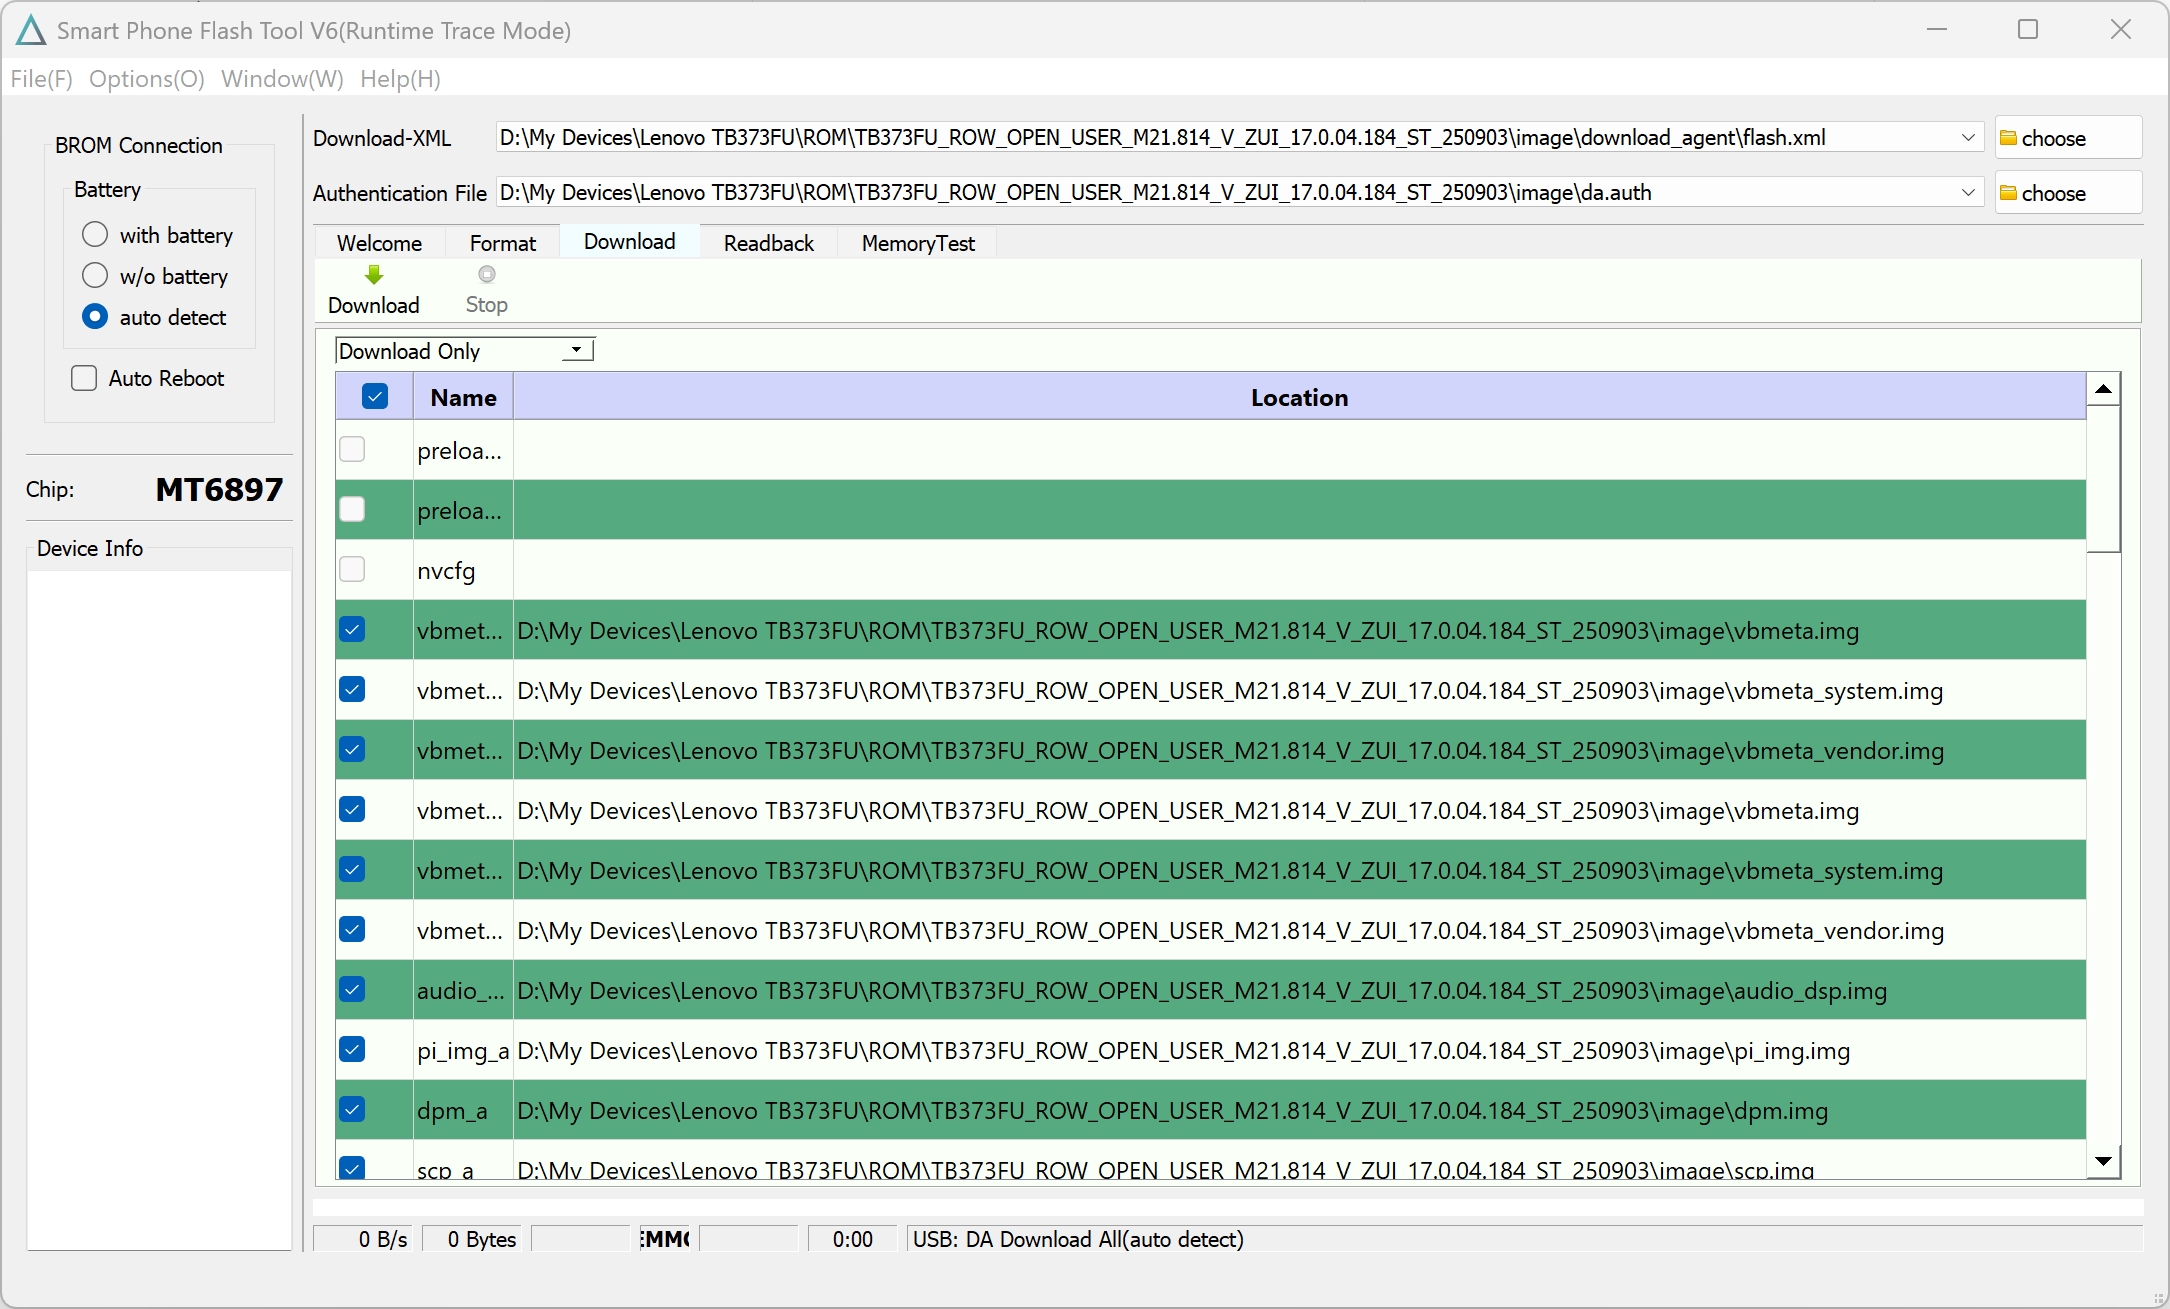
The interface should look something like this now.
Start Flashing
After checking everything, click the Download button to start flashing. It will take about 6 to 12 minutes to complete.
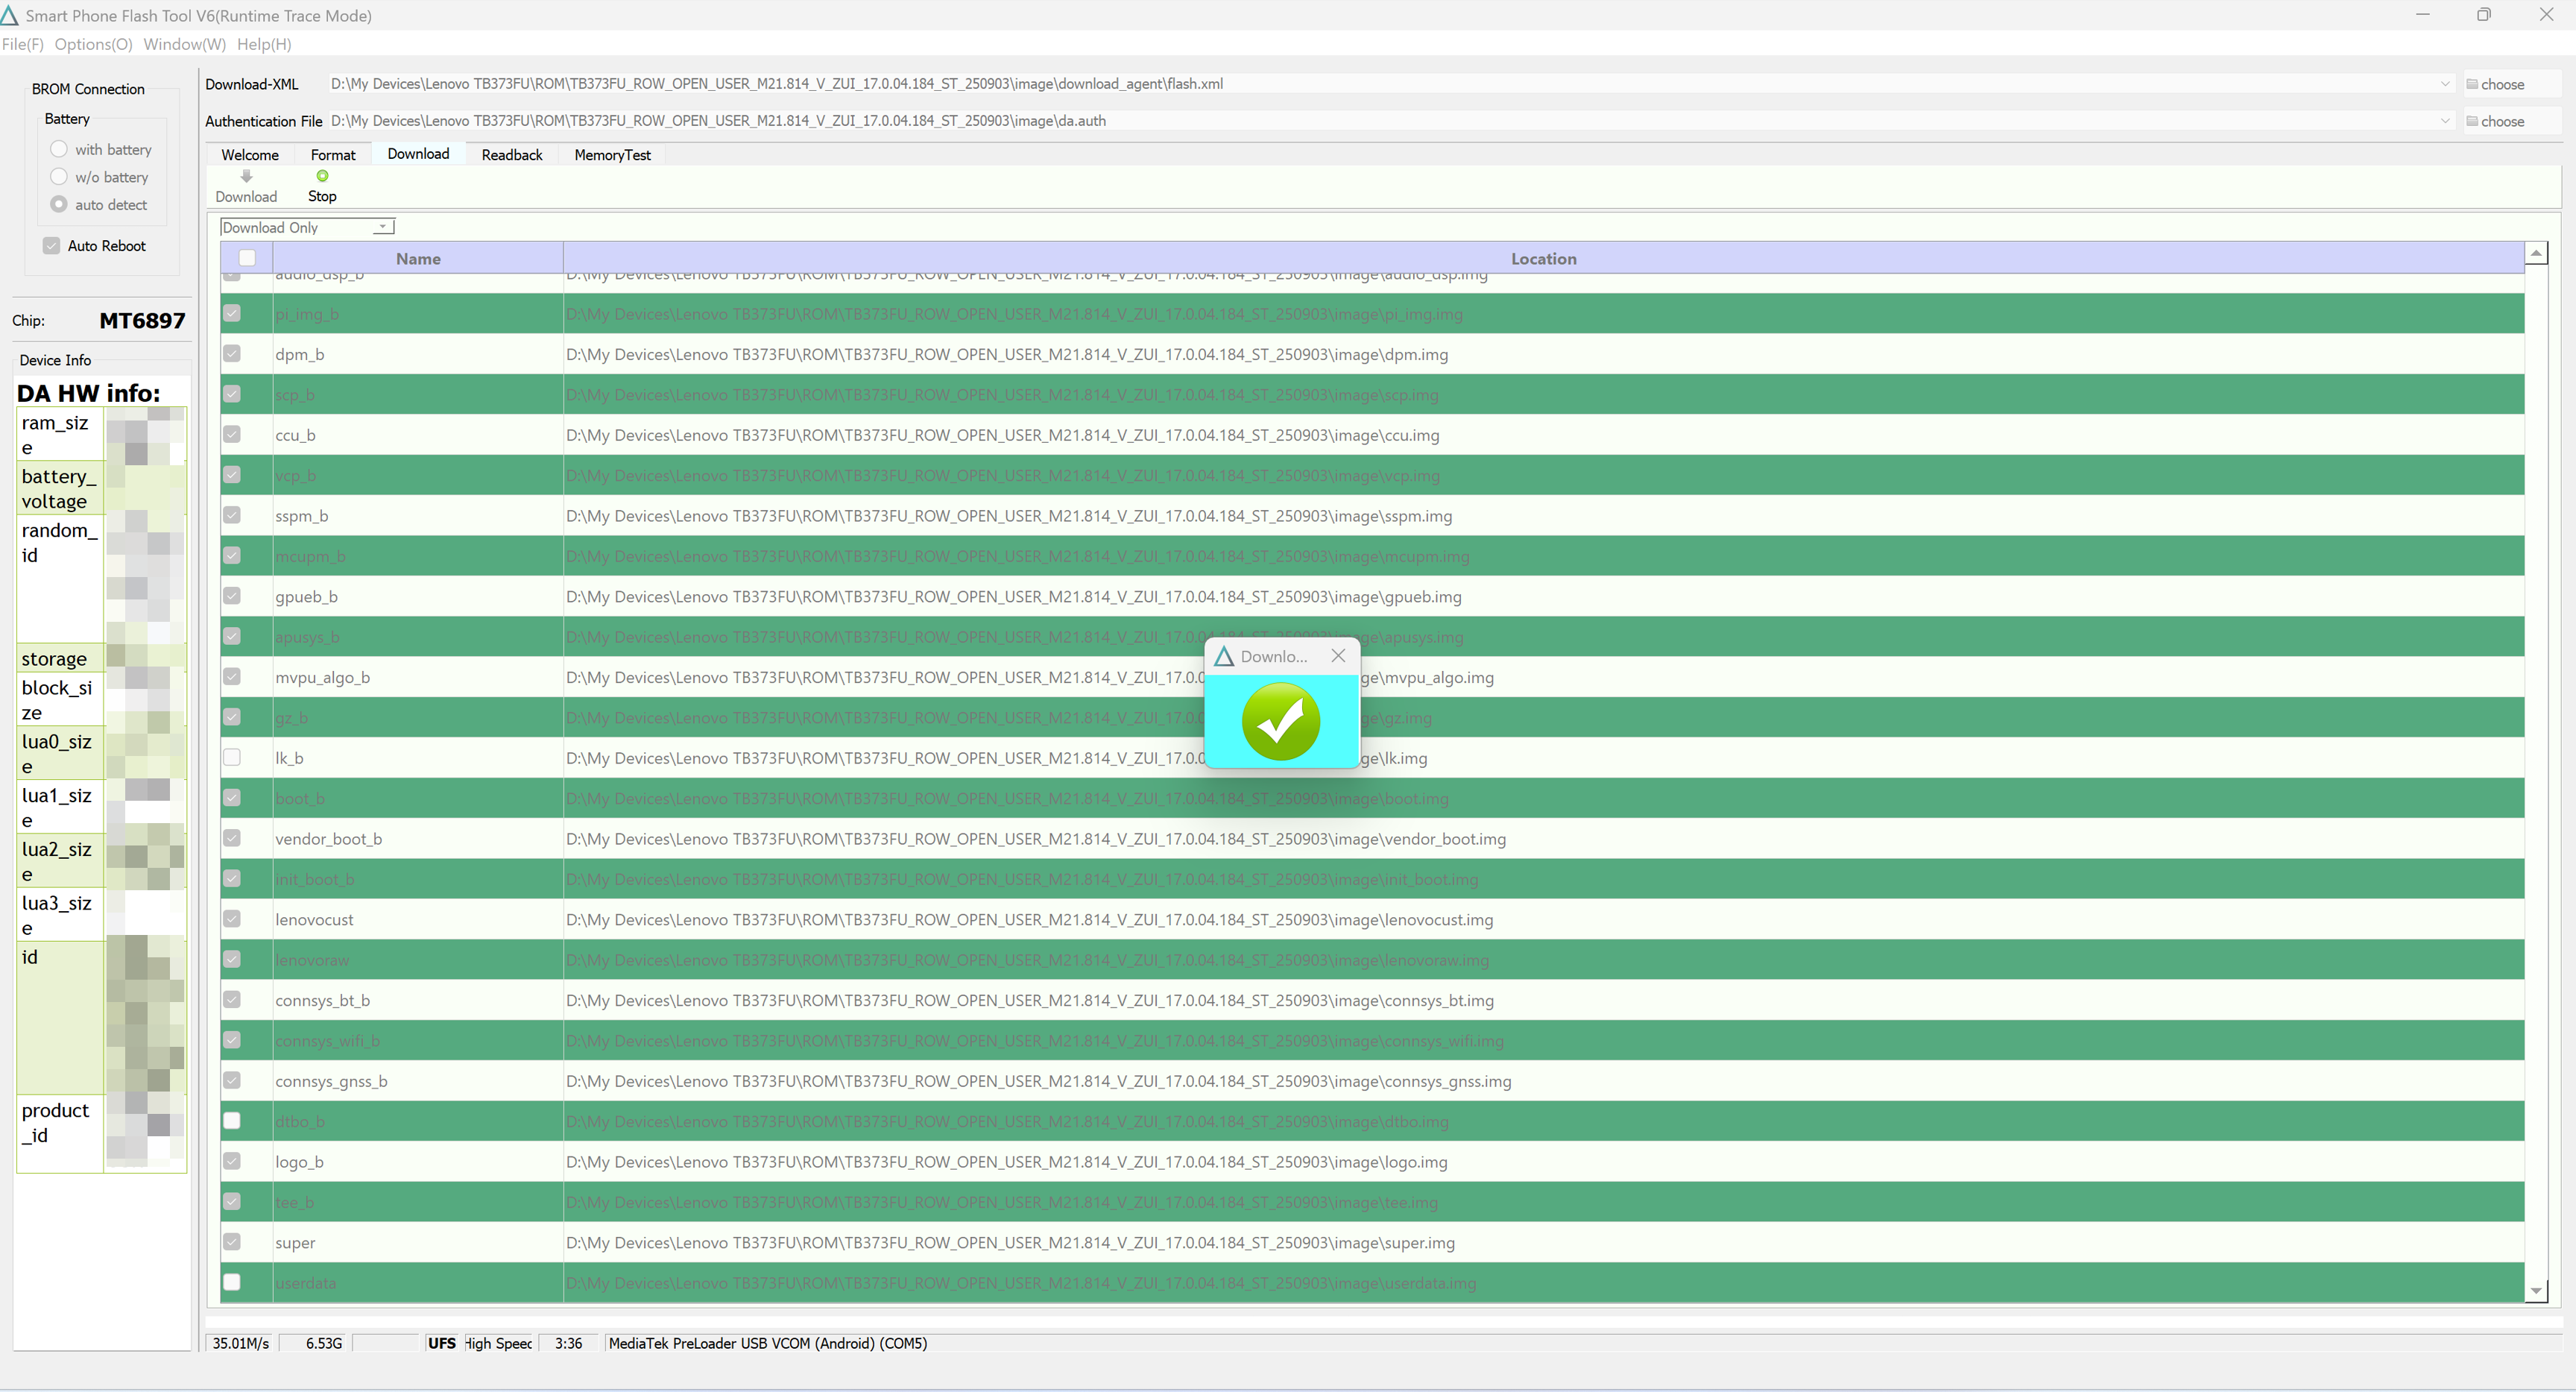
After flashing, the device will automatically restart and attempt to boot.
🕵 After Flashing
Stuck at Boot Logo
If the device gets stuck at the first boot logo (the logo flashes and the device keeps rebooting), you need to switch the A/B boot partition.
First, disconnect the data cable from the computer and device. The moment you see the boot logo, immediately long-press the Volume Up button to enter a selection menu.

In this menu, click the Volume Down button to enter Fastboot mode.
Now reconnect the cable, run PowerShell in the Android SDK Platform Tools folder, and execute ./fastboot devices to check if the device is recognized.
Once the device is connected, execute ./fastboot getvar all to read the current device status. Check the value of the current-slot field. If it’s b, you need to change it to a in the next step; if it’s a, change it to b.
Execute the following command:
./fastboot --set-active=<target_slot>

For example:
./fastboot --set-active=a
./fastboot --set-active=b
After seeing the success message, execute ./fastboot reboot to restart the device. After a short wait, you should be able to enter the Global ROM system.
Stuck in Recovery with “Data is Corrupt”
This situation is common for devices that have used third-party GKI kernels after unlocking the Bootloader.
This prompt appear because the system cannot correctly decrypt the data partition during startup. Since all Android devices launched with Android 9 or higher use AVB (Android Verified Boot) to verify the integrity of the kernel and system partitions, the BootLoader will refuse to expose the keys stored in the metadata partition to the system if it detects a system/kernel “rollback/downgrade,” resulting in the inability to decrypt files. For specific details, refer to the Google Android Verified Boot 2.0 Documentation.
However, we have been upgrading, so why does this prompt still appear? The root cause of this error is that the previously used GKI kernel was compiled later than the official kernel. The official kernel was compiled about six months ago, while most GKI kernels (including the one I maintain) were released within the last month.
Solving this error is simple. Please go here to download the fixed boot.img. Enter Fastboot mode and execute fastboot flash boot boot.img. After flashing, the device should boot normally.
🔐 Unlocking the Bootloader
⚠️ Important Notice: Risks of Unlocking the Bootloader ⚠️ Unlocking the Bootloader allows your device to run non-officially released kernels/systems, but it may also void your device’s warranty. For detailed risk warnings, please read the official Lenovo instructions. Unlocking or relocking the Bootloader will erase all data on the machine. Please backup in advance.
Lenovo’s official Bootloader unlocking channel is flawed and does not support the Xiaoxin Pad Pro 12.7 2025; obtained unlock files cannot be used normally. A developer on the XDA Forum has researched a third-party unlocking method. This method does not require applying for an unlock file from Lenovo. Thanks to author Accelerator@XDA for the research.
Obtain the LK File
The LK (Little Kernel) file is the Bootloader image for MediaTek devices. Flashing a modified image allows users to unlock the device themselves.
Be sure to verify the MD5 after downloading to ensure file integrity.
MD5: 2c01c2ecf1768555d75abf0e42cf7a78
Flash the LK Partition
Flashing via Fastboot
This is the most convenient flashing method. You can try this first, and if it fails, read the other flashing solutions below. Enter Fastboot mode and execute the following command:
./fastboot flash lk <path_to_downloaded_lk_a_file>
Wait for the success message. After the flash is successful, execute fastboot reboot bootloader to re-enter Fastboot.
Flashing via SP Flash Tool
If flashing via Fastboot fails, Lenovo may have patched the exploit in the new system version. In this case, refer to the Flashing the System steps above, but with these differences:
- Replace the
image\lk.imgin the ROM package with the downloadedlk_afile. - In the partition selection, only select the
lk_apartition.
Follow the other steps as usual. It should complete within a few seconds. Wait for the device to restart, then enter Fastboot again.
Execute Unlock Command
Execute fastboot flashing unlock_critical. You can now unlock the Bootloader directly without needing the sn.img unlock file from Lenovo.
(Extra Step) Disable VBMeta
If the device cannot boot after unlocking or if you need to flash a third-party system (such as GSI), execute these commands to disable boot verification:
fastboot flash --disable-verity --disable-verification vbmeta <path_to_backup/third-party_ROM_vbmeta>
fastboot flash --disable-verity --disable-verification vbmeta_system <path_to_backup/third-party_ROM_vbmeta_system>
fastboot flash --disable-verity --disable-verification vbmeta_vendor <path_to_backup/third-party_ROM_vbmeta_vendor>
This step is not mandatory; I have tested and found it unnecessary at least when flashing Global ROMs.